


How To Put Up Floating Shelves
12 Minute Read
As you probably already know about the team at Ben Simpson Furniture, shelves are one of our favourite items of furniture to create. We started making our floating shelves a decade ago and have since developed our range of shelving into bracket shelves too, with more to come (watch this space)! All our rustic shelving is available in the same range of colours as the rest of our products, keeping that rustic natural characteristic we all know and love!
Read our guide on how to put up floating shelves, as well as all the tools needed for a successful installation.

Tools required when putting up floating shelves?
Most floating shelves are sold with instructions that you should follow, as well as all the fixings required for hanging.
As a rule, you’ll need:
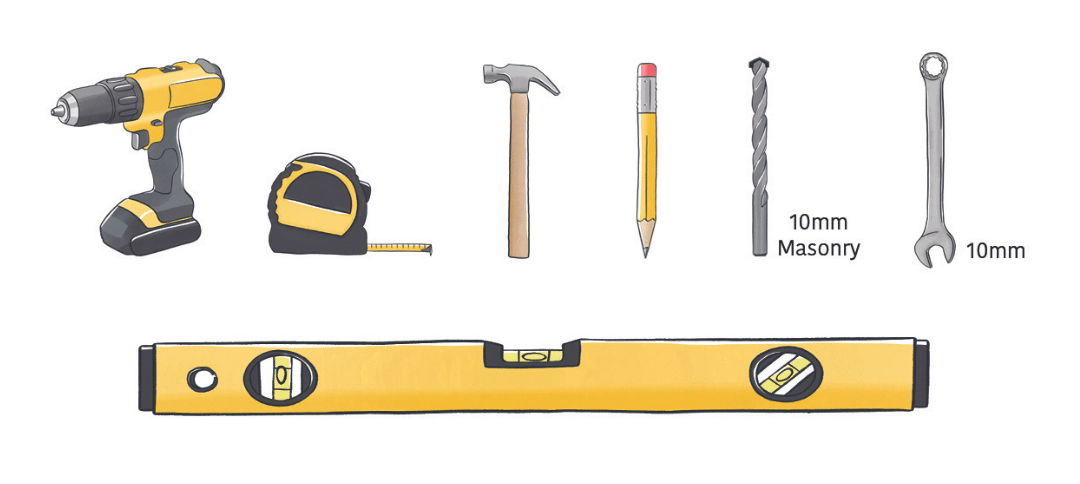

- Drill
- Tape measure
- Hammer
- Pencil
- Masonry drill bit - (10mm for our floating shelves)
- Spanner (10mm for our floating shelves)
- Spirit level
- Screwdriver
- Floating rods (x 2)
- Washers (x 2)
- Wall plugs – either plasterboard or masonry (x 2)
- Vacuum cleaner or dustpan and brush for clean up
Once you have your floating shelf, and all necessary tools, it is time to get to work. As we just mentioned, it is better to work slowly, with caution (the advice about measuring twice and cutting once definitely applies here) and you’ll be done before you know it.
Steps to putting up a floating shelf
- Identify the location on the wall that you want your floating shelf to hang & mark the midpoint with a small pencil mark.
- Measure the distance between the floating holes in the back of the shelf. Apply this measurement to the wall, ensuring the hole locations are even either side of the mid point mark (made in step 1).
- Use your spirit level to join the 3 marks on the wall. Make sure that your line is level.
- If installing near electricity. Check that the wiring is not in the drilling area.
- When you are happy you have marked the lines and where to drill correctly, (avoiding any wires) mark the spots to drill your holes – then measure one last time.
- Drill the holes into the wall with a 10mm masonry bit, and insert the wall plugs.
- Insert the floating rods into the back of the floating shelf & check that they line up with the holes in the wall.
- Pop the washers onto the floating rods & insert the floating rods into the holes in the wall.
- Then use the spanner to tighten the floating rods. (Top tip - use the chuck of the drill to tighten the rods on the wall.
- After the rods have been tightened adequately, offer up the shelf to the rods & push the shelf onto the wall.
- Check the shelf with a level. If the level is slightly off, the holes in the wall might be slightly off. Remove the shelf from the floating rods.
- Using your Spirit level, check the level of both floating rods. You might now notice that the floating rods are designed and made with an off-set cam on the rod (this helps massively with adjustment).
- Rotate the un-level rod either right or left to the desired height adjustment. And repeat Steps 12 & 13 until you are happy with the level of the shelf.
- COMPLETED!!!
Now you know how to install your floating shelf, take a look at some of the top questions our customers ask when considering a floating shelf as well as benefits of investing in shelves for your home.


Top Reason to Invest in Shelves For Your Home
Not only do they add a stylish touch, but floating shelvesthey also offer practical benefits. Shelves create unique additional storage in your home, while allowing the space to feel open. A couple of shelves above worktops in a kitchen feels much less cluttered than an additional closed cupboard would, and this applies to other rooms in the home too.
With the majority of people now wanting that open plan feel to their home, storage can be limiting. Using shelves to create storage is a great affordable investment than buying solid furniture, and by choosing a shelf in the same wooden finish as existing furniture, it is possible to create a cohesive look (check out our colour sample pack), whichever room you are installing your floating shelf in.
What are floating shelves made from?
Floating shelves are typically made from durable materials, but tend to be made from either solid wood that has been treated, or from inexpensive manufactured woods with a veneer (a thin layer on the outside).
Natural wood is often a much better option for shelving in the home since the natural features of the wood are attractive and timeless. Solid woods – mainly pine – are much more sustainable to work with than manufactured woods too. Manufactured woods require a lot of processing even before the outer layer is added, and can require chemicals and adhesives that natural woods don’t need.
Floating rods are usually made from metal, which allows them to hold a good amount of weight (35kg to be precise), while the wall plugs that are required to grip the floating rods are usually made from plastic.


Why choose floating shelves?
Floating shelves are a great choice where you need a shelf, but want to maintain a minimalist aesthetic. Unlike bracket shelves, floating shelves don’t have any hardware on display, so they provide a much cleaner look and feel that suits both traditional, and contemporary interior design styles, from farmhouse and shabby chic, to modern Scandinavian styles.
So if you're in the market for new shelves for your home,When you choose a floating shelf from Ben Simpson Furniture means you can choose from 7 different wood finishes, as well as the shabby chic and contemporary effect. We also have options that include metal features on the corners, for a more industrial effect. And with so many different finishes and styles available, you're sure to find something that fits your unique taste and style.
Are floating shelves hard to hang?
We don’t think so – as long as you have the right tools for the job! There are mistakes that can be made – such as drilling the hole too deep or at the wrong angle (this can cause a slanted shelf) – but go carefully (you can always drill a bit deeper, but filling the hole will be a pain!) and you’ll have your shelf up in no time.
Can floating shelves hold much weight?
As with all items of furniture, it really depends on the quality of the shelf. If you buy a cheap floating shelf made from MDF or particulate board, you probably won’t be able to put much more than a few ornaments on it. But they are unlikely to last, and almost certainly won’t do well with being taken down and reinstalled in a different location.
If you’re looking to place heavier items on your floating shelf – books, vases, and sculptures – then solid wood is a better option. Our floating shelves are made from solid pine, can hold up to 35kg, and will almost certainly be fine if you want to take them with you when you move house – even several times!
When moving house, trying to retrieve old floating fixings can be tricky. In this situation PLEASE give us a quick call and we will always send out replacement floating fixings for you to install in your next house.
Time to put up your floating shelves!
When you’ve completed these steps, you’re ready to style your new floating shelf! If you’re using a floating shelf for storage, then go ahead and get started tidying, but if you’re using floating shelves for wall décor, then you might want to take into consideration the advice in our post about styling the perfect #shelfie.
Feeling inspired to give your home a makeover? Don’t forget to tag us in your photos on Instagram – we’re @bensimpsonfurniture.
Follow our Instagram
Tag @bensimpsonfurniture & join our community!
Checking...
Related Posts...

What Length Mantel Looks Best?
Ben Simpson Furniture

Sustainable Christmas Decorations For The Home
Ben Simpson Furniture

How to Decorate your Christmas Dining Table
Ben Simpson Furniture

10 Eco-Friendly Fireplace Styling Ideas to Warm Up Your Space
Ben Simpson Furniture

What’s The Perfect Size Desk For A Home Office?
Ben Simpson Furniture